Clip-in hair extensions are the perfect style for anyone who is looking for a quick way to add length and volume to their hair. What’s even better is installing clip-in hair extensions might be the easiest thing you will learn. Go Sleek has you covered and we’ll detail everything you need from choosing the right clip in hair extensions to preparing your hair for installation. Keep reading and check out our detailed how to video below.
What are Clip-In Hair Extensions?
Before we get started let’s discuss the different types of clip-ins. At Go Sleek, we offer Classic Clip-Ins and Seamless Clip-Ins. With Classic Clip-Ins you will have your standard comb clip that can be attached to your hair and snapped close. Seamless Clip-ins on the other hand bring the same quality you expect in an even flatter package. Seamless clip-ins mimic the thin-ness of tape-in extensions offering more versatile styling options.
Benefits of Using Clip-In Hair Extensions
The benefits of using clip-ins in instant body and volume added to your natural hair. Some women love the idea of clip-ins because it looks more believable than full wigs, lace wigs or closures as you are able to wear natural parting.
Clip-ins are also easy for beginners to install and remove daily, allowing free range of shampooing and conditioning your hair at any time.
How to Choose the Right Clip-In Hair Extensions
When it comes to choosing the best clip-ins for your hair, you should take into account your hair’s texture, density and your desired length. Do you want a super sleek look or curls to match your natural hair? Do you want to add volume, length or both?
If you have naturally fine hair or love the idea of throwing your hair into a pony at a moment’s notice, the thinner wefts of Seamless Clip-ins are perfect.
Preparing for the Installation
Once you’ve identified the perfect texture and color of your clip-ins, gather the necessary tools and equipment. All you need is a comb for sectioning the hair and a few hair clips.
Always start on clean and conditioned hair for best results and organize the clip-ins by laying them out so it is easy to pick up each clip one by one in order.

How to Put in Clip-In Hair Extensions - Step by Step
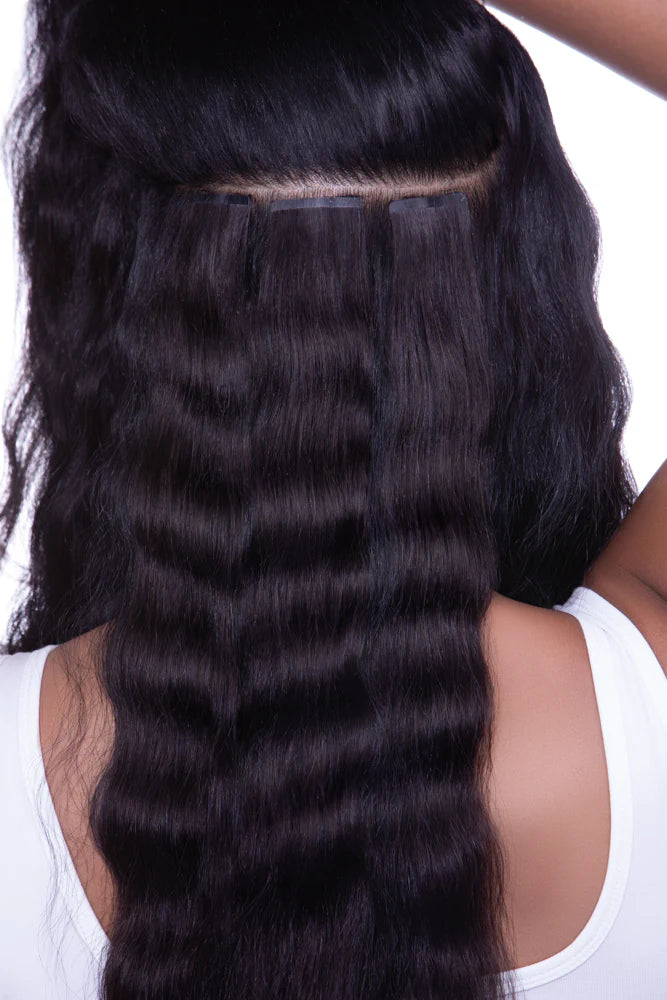
Sectioning Your Hair Properly
- Starting at the bottom section, part your hair horizontally from left to right. A good rule of thumb is parting from ear to ear.
- Section your hair depending on the style you desire. Will you be wearing a side part, center part or half-up, half down ponytail?
Preparing the Clips
- Measure which clip should be installed first by measuring the length of the clip-in compared to your head. For example, each clip-in extension ranges from 2-4 combs per clip. Determine which clip should be installed first, second and so forth.
- Practice opening and closing the clips before attaching to your hair. Once you are ready, gently lift the hair and insert the comb of the clip-in closely to your part. Snap the clip close and check to ensure it is securely attached.
- Repeat steps 1-2 working your way upwards with about an inch in between each clip-in extension. If you are installing more than 10-12 pieces you might need smaller parts in between each clip depending on your desired style of choice.
Blending the Clip-In Extensions with Your Natural Hair
The key to a perfect blend is the hair texture you choose from the beginning. Think about if you will wear your hair naturally curly or in a blown out, sleek state most of the time. Choose the best color that suits your hair as well.
Go Sleek’s Salt and Pepper Clip-ins are perfect for women who are naturally gray and want to maintain that color without. If you’re tired of dyeing and hiding your silver strands, this one’s for you!
Once the clip-ins are installed, slightly cutting the hair to frame your face will also help with a natural blend. Be sure not to cut the hair too much as it will make reinstallation harder.
Also See: Hair Extensions Before and After
Proper Maintenance of Clip-In Extensions
As with any quality human hair extensions, you should care and maintain the hair as you would your natural hair. Use gentle sulfate free shampoos and moisturizing conditioners to maintain the quality of the clip-in extensions.
Our extension hair holder makes it super easy to detangle, blow dry and flat iron the clip-ins when they aren’t installed.

To store and protect extensions, we recommend using a satin hair bag.
Avoiding Damage to Your Natural Hair
Clip-ins are 100% safe for natural hair if worn properly. Do not sleep in your clip-ins consistently as that will cause breakage. To remove clip-in extensions safely, gently open the clip and pull away from your scalp. Do not tug as that will cause breakage as well.
Frequently Asked Questions (FAQs)
How long does the installation process take?
As seen in the video above, installing clip-ins can take anywhere from 10 to 15 mins. It’s really that simple.
Can I install clip-in extensions myself, or do I need professional help?
We 100% believe anyone can install clip-ins alone; however, seeking professional help is always a good idea. A professional stylist will help you choose the best texture, length and thickness of clip-ins for a natural blend and style the hair as desired.
Are clip-in extensions noticeable in the hair?
When installed correctly, clip-in extensions are not noticeable to the hair. Never install clip-ins too close to your edges so you are able to pull the hair back naturally. Hiding the clips gives a more natural appearance.This also avoids damage to that thin area of your hair
Can I use heat styling tools on clip-in extensions?
Yes, clip-ins can be styled with heat styling tools and human hair extensions can be colored to match your hair.
How do I prevent tangling and matting of clip-in extensions?
Use a paddle-style brush to detangle with ease, brush out curls and smooth flyaways. Our Go Sleek detangler extension brush has a pillow-soft air cushion that conforms to the contours of your scalp and gentle bristles help you brush from root to tip, without the rip.
Can I sleep in clip-in extensions?
Yes you can sleep in clip-ins but doing so for extended periods of time is not recommended. Watch more information about sleeping in clip in extensions on our Youtube channel and watch below.
Can I swim or shower with clip-in extensions?
Showering with clip-in extensions is fine if using a shower cap. We do not recommend shampooing your hair in the shower with clip-ins installed or swimming with clip-in extensions.
Also Read: The Truth About Tape-In Extensions: Are They Bad for Your Hair?